
Connect your company's identity provider and create the first administrator in the Weldall setup.
Weldall has no local accounts and no passwords. Every sign-in goes through your company’s identity provider, so Weldall needs a central IdP that speaks OpenID Connect (OIDC). Google Workspace, Okta, Entra ID, Keycloak and Auth0 all do.
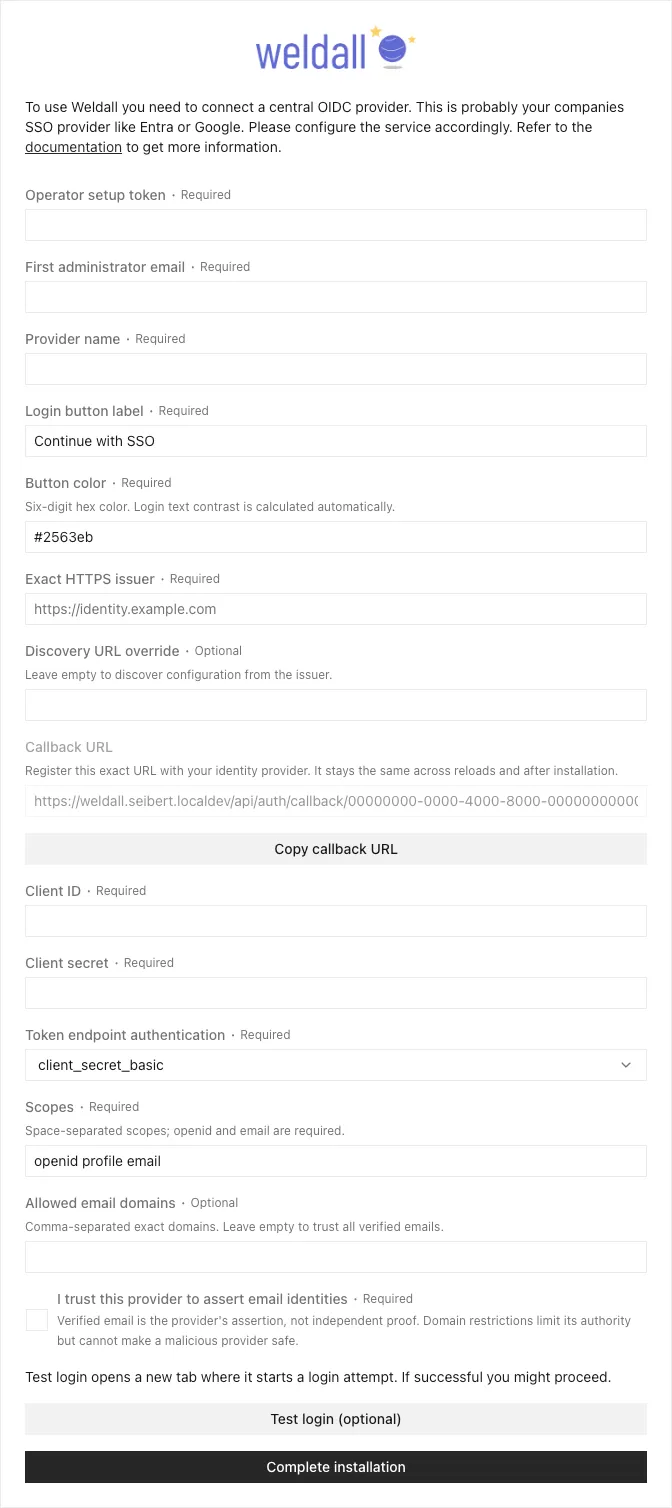
The first start is a web installer at /setup. It asks for the operator token, the first administrator, and one OIDC client. Weldall reads the provider configuration from the issuer and uses that client for every later login.
Before you start
Section titled “Before you start”- The instance answers on its public HTTPS URL. How to: Set up Weldall covers the container.
WELDALL_SETUP_TOKENandWELDALL_CREDENTIAL_ENCRYPTION_KEYare set on the server. Without them the installer stays closed.- Access to your IdP to create an OIDC client. Google calls it an OAuth client; the form asks for its client ID and secret.
1. Open the installer
Section titled “1. Open the installer”Open https://weldall.example.com/setup. The page stays open until one installation is complete; afterwards it redirects to the login page.
2. Fill in the form
Section titled “2. Fill in the form”| Field | What to enter |
|---|---|
| Operator setup token | The WELDALL_SETUP_TOKEN from the server configuration. It authorizes the installation. |
| First administrator email | The address that becomes the first administrator. Only this address can complete the installation, and it receives weldall:administer and weldall:login. |
| Provider name | Internal name of the provider, for example Google. It appears in the administration interface. |
| Login button label | Text of the sign-in button on the login page, for example Continue with SSO. |
| Button color | Six-digit hex color of that button, for example #2563eb. Weldall picks black or white text for contrast. |
| Exact HTTPS issuer | The issuer of your IdP, without trailing slash or query, for example https://accounts.google.com. Weldall reads the provider configuration from <issuer>/.well-known/openid-configuration. |
| Discovery URL override | Optional. Only needed when your IdP publishes its configuration somewhere other than under the issuer. |
| Callback URL | Read-only. Register it with your IdP, see step 3. |
| Client ID | The client or application ID of the OIDC client you created for Weldall. |
| Client secret | The secret of that client. Weldall encrypts it before it stores it. |
| Token endpoint authentication | How the client authenticates at the token endpoint. client_secret_basic sends the credentials in the Authorization header, client_secret_post in the request body. Your IdP documents which one it expects. |
| Scopes | Space-separated scopes for the login request. openid and email are required, profile adds the display name. |
| Allowed email domains | Optional. Comma-separated exact domains, for example example.com. Identities from other domains are rejected. Empty accepts every verified address. |
| I trust this provider to assert email identities | Confirms that you accept the provider’s verified email as the identity Weldall maps scopes to. |
3. Register the callback URL
Section titled “3. Register the callback URL”Copy the callback URL from the form into the redirect URLs of the OIDC client:
https://weldall.example.com/api/auth/callback/00000000-0000-4000-8000-000000000001The first provider keeps the fixed ID 00000000-0000-4000-8000-000000000001, so the URL stays the same across reloads and a repeated installation. Public providers require the exact URL; a mismatch is the most common reason a test login fails.
4. Test the login
Section titled “4. Test the login”Test login opens a new tab and signs in with the values from the form. The test passes when the provider returns the nominated administrator email. Nothing is saved; correct the values and test again.
5. Complete the installation
Section titled “5. Complete the installation”Complete installation starts a fresh login. Once it succeeds, Weldall saves the provider, creates the administrator account, grants it weldall:administer and weldall:login, and closes the installer for good.
Both buttons start a single-use attempt that is bound to your browser and expires after ten minutes. A wrong email or a cancelled login can be retried.
After the installation
Section titled “After the installation”The administrator signs in on the login page and configures scopes, resources and assignments in the administration interface. Weldall never grants weldall:login from the identity provider: assign it to employees before their first CLI login, either directly or through a provider group.
Next steps
Section titled “Next steps”- How to: Integrate a service — protect an API with the SDK.
- Group providers — read groups and memberships from your IdP.
- Infrastructure as code — manage settings, scopes and assignments as code.